


I finally found a way to do this myself, thanks to a technique I learnt on one of the photo forums. Here's a Before & After using actual photoshop element commands with no other readymade actions.

Here are the steps to achieve the skin tone fix. These can be done in Gimp, PSE or PS.
1. Duplicate your layer
2. Run the High Pass Filter. I usually choose a radius between 5 and 7 depending on the picture I am working with and always err on the side of a lower number.
3. After you've run the highpass filter in step #2, you will notice the image overly sharp and your image will be gray ! Which is the opposite of what we want. Don't panic ! We will invert this layer. An easy way to do it is to press command I on the mac.
4. Next we change the blending mode to either softlight or overlay. What was that? Did I hear you say now my picture is blurry? Relax. We have one more step to do. Add a layer mask. Now invert it so that the layer mask is black (on the mac it can be done by selecting the mask and pressing command I). Now you're back to the look you started with.
5. Pick a soft round white brush with opacity set between 20-30% and paint all over the skin keeping away from the edges, eyes, nose and mouth. You can paint multiple times until you're happy with the result.
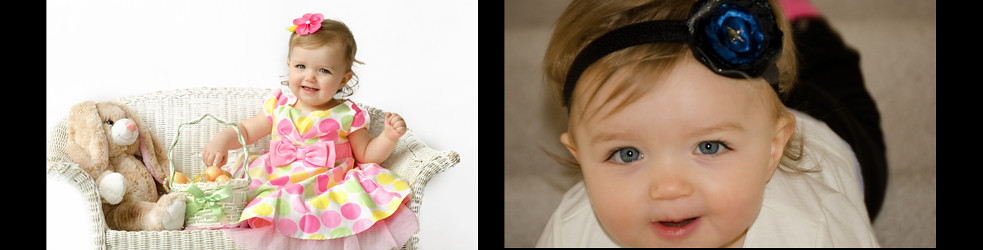
I find that following this procedure does not destroy the natural texture of the skin. The little darling shown in the picture has gorgeous blue eyes which weren't quite showing up in the picture. I for one, love bringing out the color in the eyes in my photos. The few awesome actions that exist to do this, are not free. While some day in the future, I may end up buying the action to make my life easy, at this time I really don't have the $$ to spend on it. Agreed the action would do this for me in 30 seconds or less but at this juncture, I'd much rather spend 3 minutes doing it myself and put the $$ towards my gear or another accessory. Here's how I do it. I divide my process so that I'm tackling 4 different parts of the eye (again the coffee shop powder room action has an eye enhancement step in it that you can use if you wish)
- Since I usually shoot outdoors, my subject's eyes have some sky reflecting in them. When I shoot indoors I keep the subject near a window or in some cases use a flash. This circle/reflection is called a highlight and it gives "life" to the subject. So, I first work on making the highlights more prominent. Bring up the dodge tool select the range as "highlights" and the exposure to a value between 20-25%
Adjust the size of the brush to cover the highlight area. Then run the brush over the highlight in the eyes.
- Next I work on the colored area of the eyes. ie the iris. The iris is usually a shade of brown, green or blue. To enhance this, select the dodge tool again, set the range to midtones this time. Leave the exposure between 20-25 %. Run the brush over the iris keeping away from the pupil (the center black portion of the eye). Brush over more times to improve the color to what you like. Just don't go overboard or the eyes will stop looking like eyes and start looking more like marbles.
- Then, if you wish, you can brighten the white portions of the eyes (called Sclera) by choosing the highlight option with the dodge tool however, I don't usually do this unless the the sclera is very dull or dark. You can also burn the pupil (I know that sounds awful!) using the burn tool, choosing the range as Shadows and choosing an exposure between 20-25%. Again I don't usually do this.
- Finally, I run the unsharp mask filter (which, contrary to what the name might suggest actually sharpens an image).

Since I don't want the entire image sharpened, I then add a layer mask and invert the layer mask (so that the layer mask turns black). I then brush over the entire eye using a soft round white brush that is wide enough set at a low opacity. Again, its best to err on the side of less sharpening or your subjects will end up looking like a zombie out of a horror movie
Feel free to email me if you have questions. If this technique helps you, I would love to see your B&As on my facebook page here.


0 comments:
Post a Comment